
Part 7: Request Forecourt Configuration from the PCC
Navigate to:
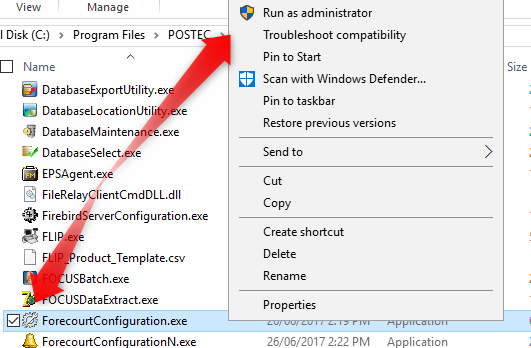
- C:\Program Files\POSTEC\Focus (for 32 Bit)
- C:\Program Files (x86)\POSTEC\Focus (for 64 Bit)
- Highlight and Rick Click “ForecourtConfiguration.exe”
- Select Run as Administrator
- A login box will appear. The Login credentials are:
- Username: Administrator
- Password: Password
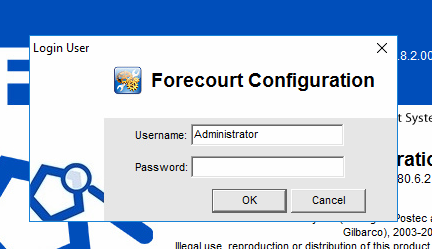
- Select OK to Proceed
- Welcome to Forecourt Configuration.
- You want to ensure you are connected to the PCC (or even the correct PCC – if there is more than one onsite)
- You can identify if you are not by checking the Status Bar at the bottom of the program.
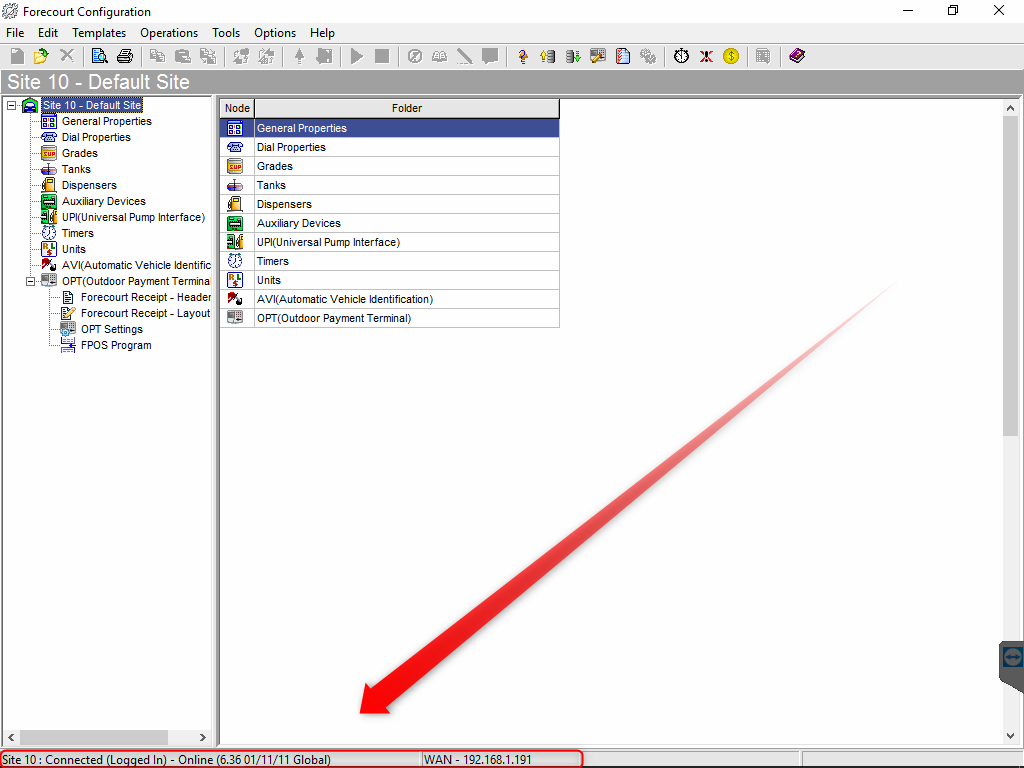
- If you see anything that says Disconnected or Logged out, you will need to check your network settings and rerun PART 6 in its entirety
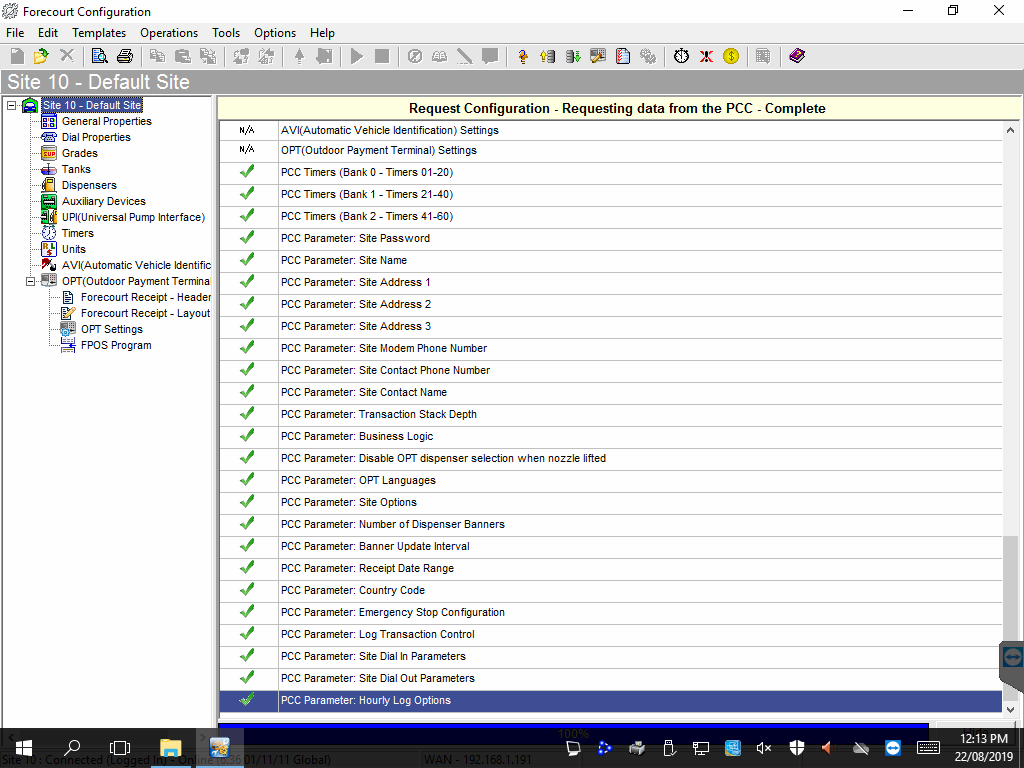
- If all is connected and logged in. You can Select TOOLS > REQUEST CONFIGURATION
- NOTE: DO NOT SELECT SEND CONFIGURATION. IF YOU DO, YOU WILL WIPE THE DATABASE IN THE PCC with the Database on the PC. Since your database has no Settings. The PCC will be Updated with no Settings. We want to for the first time Request the settings from the box. As TRAX Retail have already prepared the sites Fuel Settings.
- Either way, a warning prompt will display, letting you know what is about to happen.
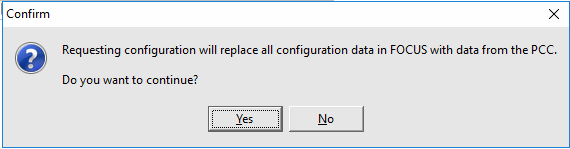 Once you click yes. The software will pull the data from the PCC. And the database on the PC will mirror the settings within the PCC.
- You Can now Close Forecourt Configuration.
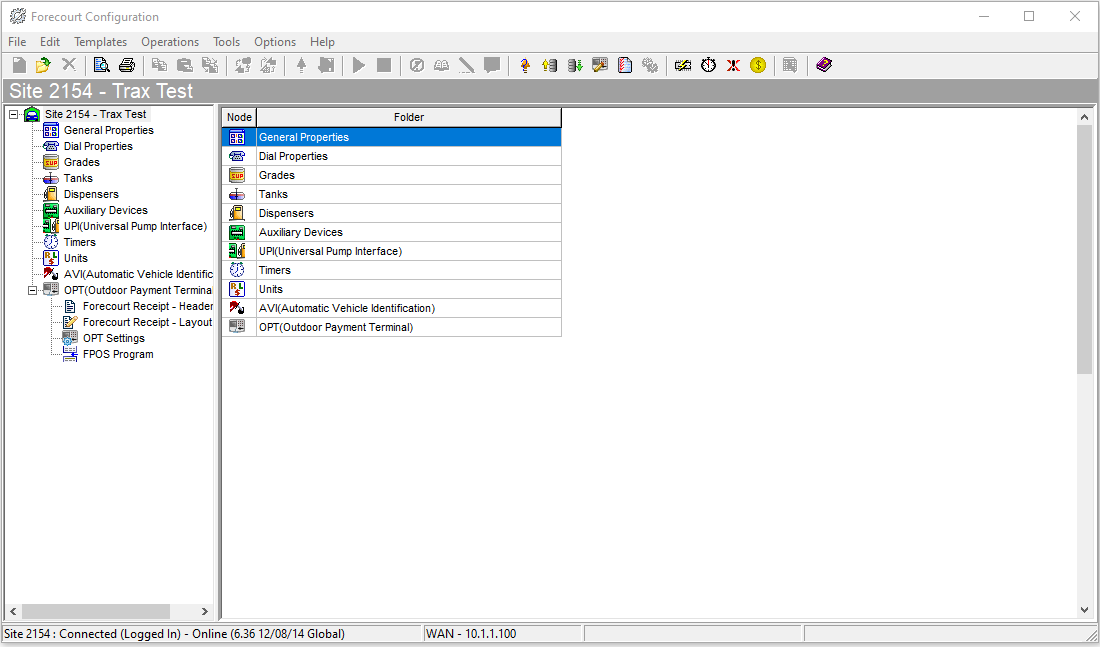
These are the settings in Forecourt configuration to give an understanding as to what’s involved when settings up a new PCC.

General Properties
- These are settings related to the Site (Trading name, Address Contact etc.)
- Double click the General Properties on the right.
- Opens this screen
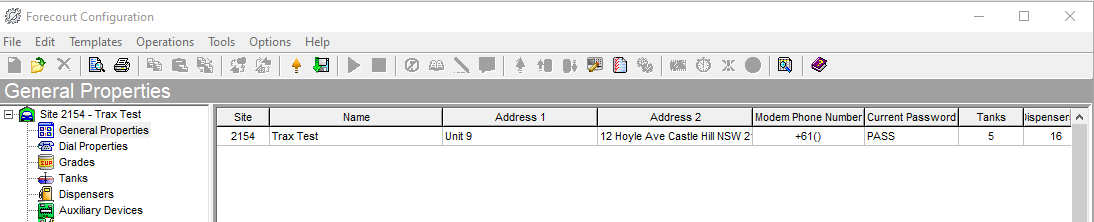
- Double click the General Properties line on the right.
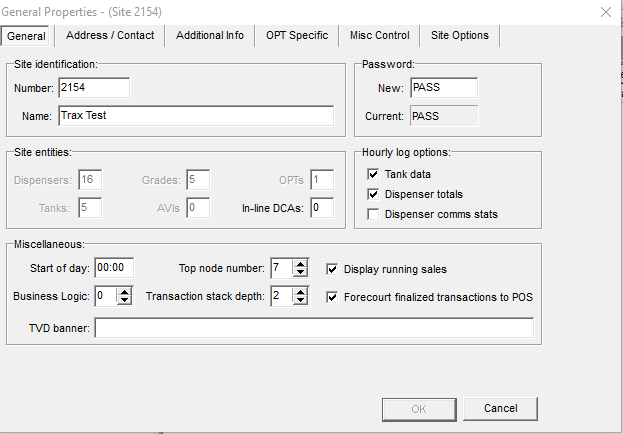
General Tab
- I set the store number to the Postcode of the site, or the site number used by the fuel suppliers. PASS is the normal password. Check the Top Node is 7 and the Stack Depth is 2.
- Tick Display running totals and tick Forecourt finalized transactions to POS
Address Tab
- Click on the address tab and make sure the country pulldown has been set to Australia or the country where the Postec is being installed. This ensures the currency structure is set up correctly.
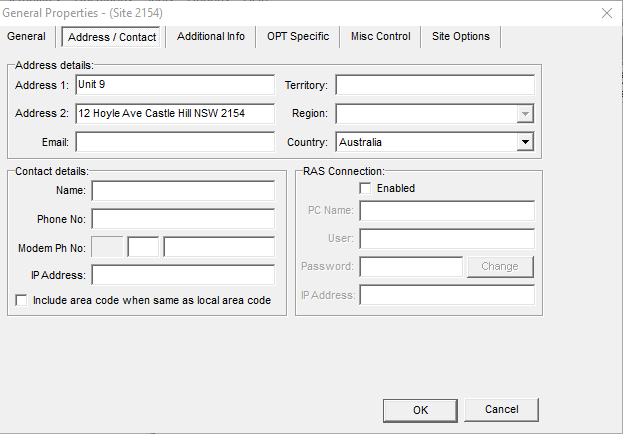
- You shouldn’t need to alter any other of the tabs.
Dial Properties
- This is for when the telephone Modem was the access.
- Set to Never.
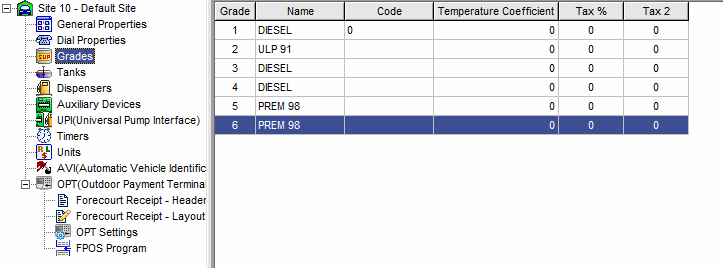
Grades
- This is where the Fuel Grades are setup EG: Unleaded, Diesel, ULP, ULP 95 Whatever.
- The Grade number in this configuration should match the grade number of the Stock Item on Idealpos. To delete a grade, you must start at the bottom and work up.
- EG: Grade 1 | Diesel // Stock Item 1 – Diesel.
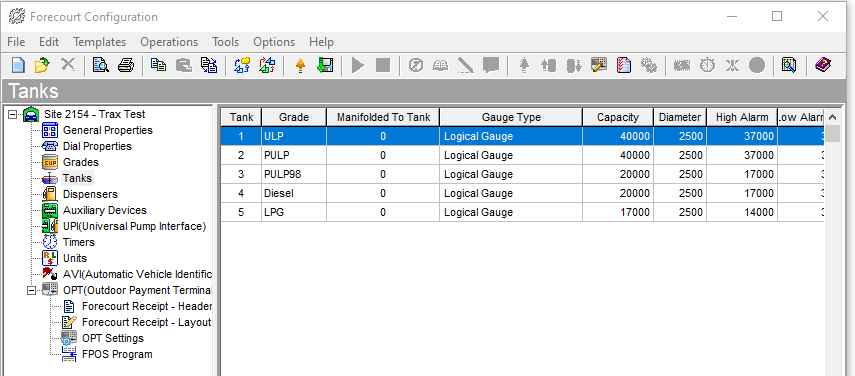
Tanks
- You must setup the Tanks before you attempt changing any of the Dispensers
- Double click on the tank.
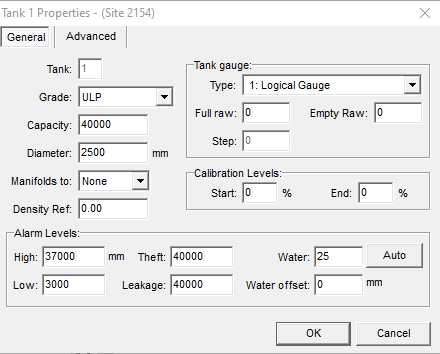
- Set the Grade using the drop down. (This is why you need to have set the Grades up first.)
- Now use in Type: Logical Gauge - This means as the fuel is dropped into the POS it is reduced from the tank.
- Set the Capacity. If unsure, the dipstick in the tank should have the value stamped at the top. You want the full capacity not, the Safe Fill Level.
- The diameter is not that important but 2500 is a good all-round value.
- Calibration is only used when connected to an ATG (Automatic Tank Gauge) and should be discussed with the supplier of the ATG.
- Click on the Auto in the Alarm Levels box. This calculates the safe fill based on the 80% full.
- (Unfortunately, the Tanker drivers don’t stick to the rules and quite often fill past the Safe Fill Level. If they do the site will be unable to enter a delivery until the tank has dropped below the Safe Fill Level with the delivery added.)
- We need to calculate the High Alarm to 97% to ensure they can enter all deliveries. Using the Tank in the example above 40000 x 0.97 =38800
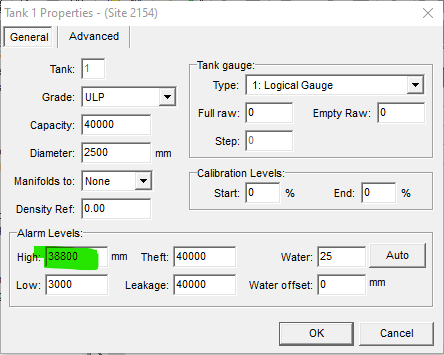
Change the High Fill Alarm to 38800
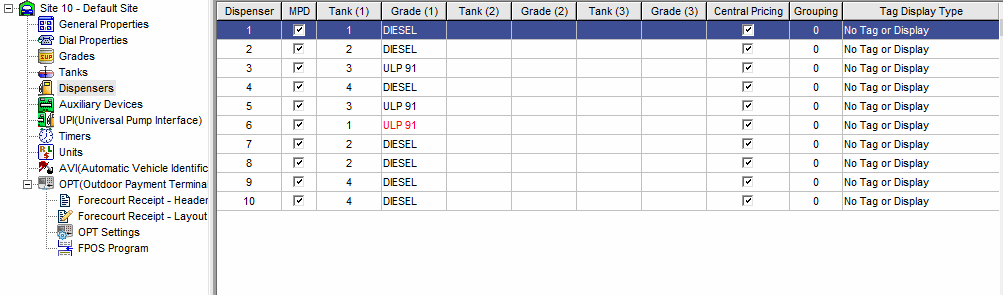
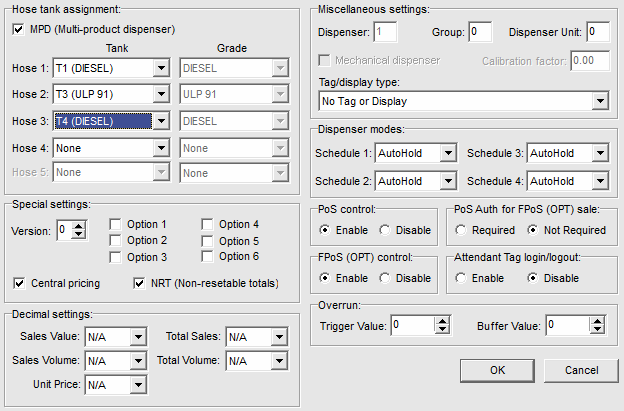
Dispensers
- Configuration for the pumps dispensing fuels. You can configure a single grade dispenser or a Multiproduct dispenser (normally three hoses operating on one dispenser).
Example of Multi – Product Dispenser Properties.
Auxiliary Devices (If you’re in here, GET OUT!)
- These settings control External Peripherals.
- The normal settings we apply are for:
- PIPI – Customer Display that comes with the PCC (A legal requirement and must be on at all times) Aux 6
- Pump Controller – Postec using Focus is the POS Terminal and always xFuel Retail. Aux 9.

- POS Terminal – Connection to Our system.
UPI (Universal Pump Interface) Trax would have set this up in the Config (If you’re in here, GET OUT!)
- Also setting related the Pump Controller on the wall next to the PCC normally.

- Postec can support more than one UPI (when sites have 16+ pumps).
- The Rest you can ignore.
- It's best to seek advice from Trax Retail if any settings need to be changed here.
You now have the Forecourt Settings Saved Locally.
Continue to PART 8: Installing the POSTEC License File
PART 1: Installing Firebird Database
https://help.idealpos.co/part-1-installing-firebird-database
PART 2: Installing Focus Suite
https://help.idealpos.co/part-2-installing-focus-suite
PART 3: Grant Windows permissions on Idealpos & POSTEC Related Folders
https://help.idealpos.co/part-3-grant-windows-permissions-on-idealpos-postec-related-folders
PART 4: Opening Ports for the Firebird Database | Specify Ports for Firebird
https://help.idealpos.co/part-4-opening-ports-for-the-firebird-database
PART 5: Registering the Firebird Database
https://help.idealpos.co/part-5-registering-the-firebird-database
PART 6: PCC Network Setup & Connection Wizard (Single and MultiPOS)
https://help.idealpos.co/part-6-pcc-network-setup-connection-wizard
PART 7: Request Forecourt Configuration from the PCC
https://help.idealpos.co/part-7-request-forecourt-configuration-from-the-pcc
PART 8: Installing POSTEC License file
https://help.idealpos.co/part-8-installing-postec-licence-file
PART 9: Forecourt Manager- Add User Profiles & Attendants
https://help.idealpos.co/part-9-forecourt-manager-add-user-profiles-attendants
PART 10: Setting up Integration Mode / Adjusting Visual Console Appearance
https://help.idealpos.co/part-10-setting-up-integration-mode-/-adjusting-visual-console-appearance
PART 11: Idealpos Configuration and Start up sequence
https://help.idealpos.co/part-11-idealpos-configuration-and-start-up-sequence
PART 12: Configuring the Master Database
https://help.idealpos.co/configuring-postec-master-database
PART 13: Setting up Windows Sharing for Master Database Configuration
https://help.idealpos.co/setting-up-windows-sharing-for-master-database-configuration