
PART 11: Idealpos Configuration and Start up sequence
In Idealpos the Stock Items Related to Fuel, need to match the Grade codes in Forecourt configuration.
In this example, the grades in Forecourt Configuration are:
- ULP
- PREM 95
- DIESEL
In Idealpos, create stock items with matching Descriptions. 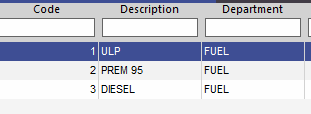
Next, we need to map these for the integration in Setup>Global Options > Interfaces 2
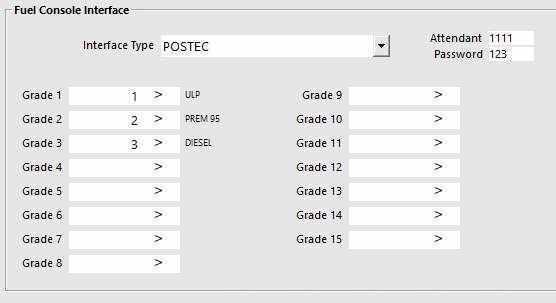
You will also need to set the Interface type to POSTEC and Add in an Attendant code from FOCUS.
Idealpos is now ready for integration.
The last thing to make sure of, is that Visual Console always opens on Startup before Idealpos.
The best method is to put Visual Console in the startup folder for all users.
To do this. Select in Windows and Select the Run Command. (CTRL + R)
Enter in the following command.
Shell:common startup
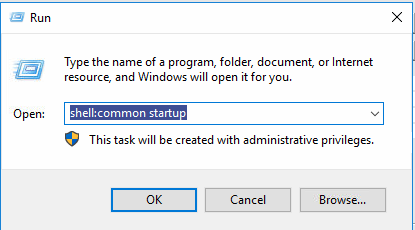
This folder will automatically start programs when the PC is turned on.
If you go to:
- C:\Program Files\POSTEC\Focus (for 32 bit)
- C:\Program Files (x86)\POSTEC\Focus (for 64 bit)
And right click on VisualConsole.exe
Select Create shortcut, Copy the Shortcut and Paste it into the start-up Folder.
The Integration will now start seamlessly.
Congratulations!
POSTEC is now installed.
Continue to PART 12: Configuring the Master Database
PART 1: Installing Firebird Database
https://help.idealpos.co/part-1-installing-firebird-database
PART 2: Installing Focus Suite
https://help.idealpos.co/part-2-installing-focus-suite
PART 3: Grant Windows permissions on Idealpos & POSTEC Related Folders
https://help.idealpos.co/part-3-grant-windows-permissions-on-idealpos-postec-related-folders
PART 4: Opening Ports for the Firebird Database | Specify Ports for Firebird
https://help.idealpos.co/part-4-opening-ports-for-the-firebird-database
PART 5: Registering the Firebird Database
https://help.idealpos.co/part-5-registering-the-firebird-database
PART 6: PCC Network Setup & Connection Wizard (Single and MultiPOS)
https://help.idealpos.co/part-6-pcc-network-setup-connection-wizard
PART 7: Request Forecourt Configuration from the PCC
https://help.idealpos.co/part-7-request-forecourt-configuration-from-the-pcc
PART 8: Installing POSTEC Licence file
https://help.idealpos.co/part-8-installing-postec-licence-file
PART 9: Forecourt Manager- Add User Profiles & Attendants
https://help.idealpos.co/part-9-forecourt-manager-add-user-profiles-attendants
PART 10: Setting up Integration Mode / Adjusting Visual Console Appearance
https://help.idealpos.co/part-10-setting-up-integration-mode-/-adjusting-visual-console-appearance
PART 11: Idealpos Configuration and Start up sequence.
https://help.idealpos.co/part-11-idealpos-configuration-and-start-up-sequence
PART 12: Configuring the Master Database
https://help.idealpos.co/configuring-postec-master-database
PART 13: Setting up Windows Sharing for Master Database Configuration
https://help.idealpos.co/setting-up-windows-sharing-for-master-database-configuration